

Imagine sinking your teeth into a delightful cake pop, where the rich chocolate coating gives way to a sweet explosion of moist cake and creamy frosting. Each bite feels like a celebration, with flavors dancing on your palate and an irresistible sweetness that makes you smile. These little bites of joy are not just treats; they’re the perfect party companions, ideal for birthdays, holidays, or whenever you want to sprinkle some magic into your day.
As I recall my first attempt at making cake pops, the kitchen turned into a whirlwind of flour, frosting, and laughter—who knew such a simple recipe could lead to such delicious chaos? With their charming appearance and playful nature, cake pops are more than just dessert; they’re an experience waiting to be shared with friends and family. Get ready to dive into a world of flavor that promises to tickle your taste buds and inspire some sweet memories along the way!
Why Will You Keep Making Cake Pops?
Deliciously fun and bite-sized, cake pops are a crowd favorite! Easy to make with just a box of cake mix, they come together in about 30 minutes. Versatile in flavor, you can use any cake mix to suit your taste. Customizable toppings like sprinkles add a personal touch. Plus, they’re perfect for parties or as a delightful treat for any occasion!
Cake Pops Ingredients
- For the Cake Base
- 1 box cake mix (any flavor) – Choose your favorite flavor to create delightful cake pops that everyone will love.
- 1 cup water – This is essential for hydrating the cake mix and ensuring a moist texture.
- 1/2 cup vegetable oil – Adds richness and keeps the cake pops tender and delicious.
- 3 large eggs – These provide structure and moisture, making your cake pops fluffy.
- For the Frosting
- 1/2 cup buttercream frosting (store-bought or homemade) – Use this to bind the cake crumbs together for easy shaping into pops.
- For the Coating
- 2 cups chocolate chips (for melting) – Choose semi-sweet or milk chocolate for a sweet, creamy coating that will cover your pops perfectly.
- 1 tablespoon coconut oil (to thin the chocolate) – This helps achieve a smooth, drizzle-ready consistency for your chocolate coating.
- For Decoration
- 1 cup sprinkles (optional) – Add a fun touch to your cake pops with colorful sprinkles that make them visually appealing and festive!
How to Make Cake Pops
1. Preheat the oven to 350°F (175°C). Prepare your cake mix according to package instructions by combining the cake mix, 1 cup water, 1/2 cup vegetable oil, and 3 large eggs until smooth.
2. Pour the batter into a greased baking sheet and bake for 15-20 minutes. Keep an eye on it; when a toothpick comes out clean, it’s ready!
3. Cool the cake completely on a wire rack. Patience is key here—allowing it to cool fully ensures your cake pops will hold their shape beautifully.
Make Cake Crumbs:
4. Crumble the cooled cake into a large mixing bowl. Use your hands to break it apart into fine crumbs for that perfect texture.
5. Mix in 1/2 cup of buttercream frosting until well combined. The mixture should be moist but not overly sticky—this will help form those delightful cake balls.
6. Scoop out small portions with a cookie scoop and roll them into balls. Place each ball onto a baking sheet lined with parchment paper, making sure they’re evenly spaced.
Chill the Cake Balls:
7. Refrigerate the cake balls for at least 30 minutes. This will firm them up nicely and make them easier to coat later.
Coat the Cake Pops:
8. Melt 2 cups of chocolate chips with 1 tablespoon of coconut oil in a microwave-safe bowl, stirring until smooth and glossy—a lovely dip for your pops!
9. Dip the end of each lollipop stick into the melted chocolate, then gently insert it into the center of each chilled cake ball for stability.
10. Coat each cake ball in the melted chocolate, allowing any excess to drip off before placing them back on the parchment paper.
11. Sprinkle decorations over your coated cake pops while the chocolate is still wet if desired—this adds a fun touch!
12. Serve your finished cake pops once the chocolate has hardened! Arrange them on a decorative stand or in a container for an eye-catching display.
Optional: For extra flair, use themed sprinkles according to the occasion!
Exact quantities are listed in the recipe card below.
Pro Tips for Cake Pops
- Choose Your Flavor: Select any cake mix flavor that your family loves; classic vanilla or chocolate are always crowd-pleasers.
- Cool Completely: Ensure the cake is fully cooled before crumbling to avoid a soggy texture in your cake pops.
- Don’t Skimp on Frosting: Use enough buttercream frosting to bind the cake crumbs together; too little will result in dry cake pops.
- Perfect Chocolate Dip: Add coconut oil to the melted chocolate for a smoother coating, preventing it from clumping or cracking.
- Chill Well: Refrigerate the cake balls long enough to firm up; this helps them hold their shape when dipped in chocolate.
- Decorate Quickly: Sprinkle decorations right after dipping, as the chocolate sets quickly and won’t stick if you wait too long.
How to Store and Freeze Cake Pops
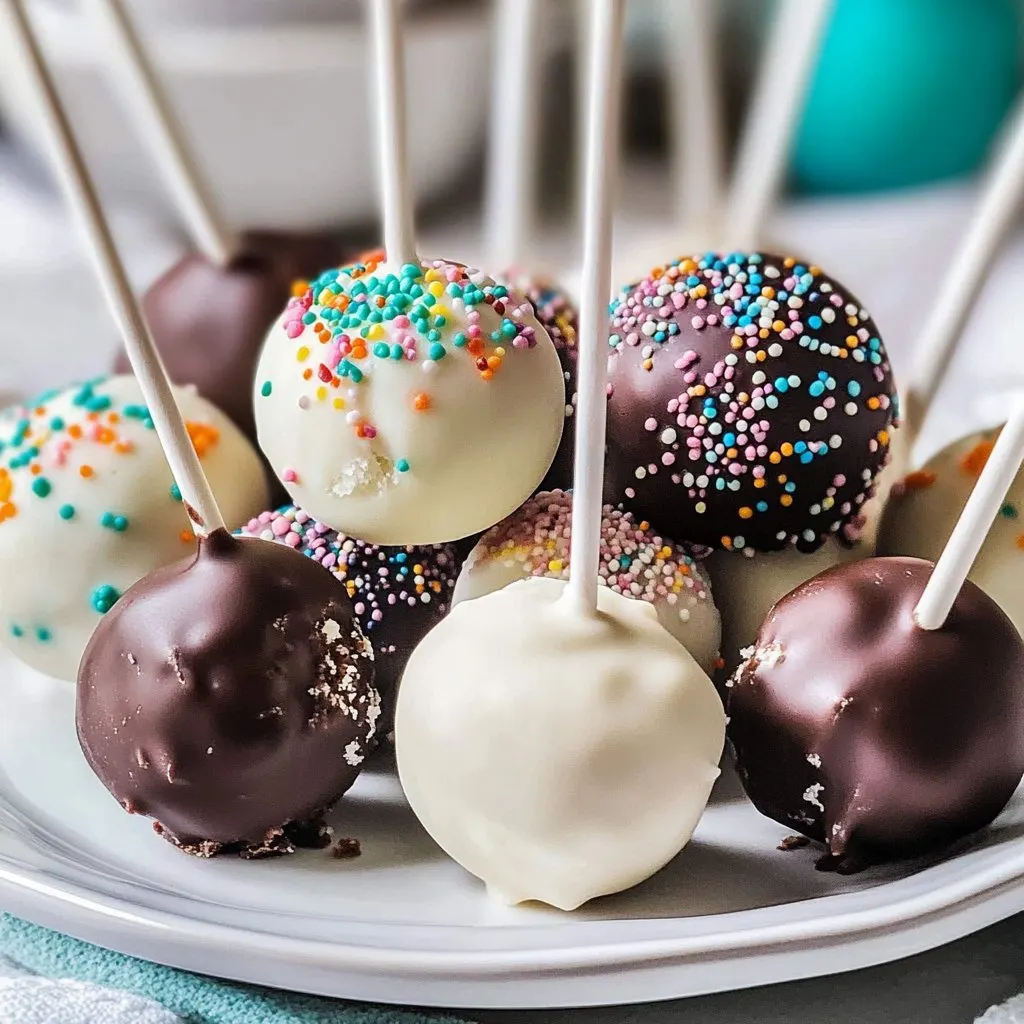
- Room Temperature: Cake pops can be stored at room temperature in an airtight container for up to 2 days. Keep them away from direct sunlight for optimal freshness.
- Fridge: If you want to extend their life, store cake pops in the refrigerator for up to 1 week. Make sure they are in a sealed container to prevent them from drying out.
- Freezer: For longer storage, freeze your cake pops for up to 3 months. Wrap each one tightly in plastic wrap, then place them in a freezer-safe bag.
- Reheating: To enjoy frozen cake pops, simply remove them from the freezer and let them thaw in the fridge for a few hours before serving.
Cake Pops Your Way
Get ready to unleash your creativity and customize these delightful treats to suit your cravings!
- Gluten-Free: Use a gluten-free cake mix to make these pops suitable for everyone. Simply follow the package instructions and proceed as usual. They’ll be just as delicious and loved by all!
- Chocolate Lovers: Opt for chocolate cake mix instead of vanilla for an extra rich flavor. This variation will add depth and decadence, turning every bite into a chocolatey paradise.
- Fruit Infusion: Incorporate 1 cup of mashed bananas or applesauce into the cake mix for a fruity twist. The added moisture keeps your pops super soft while giving them a delightful natural sweetness.
- Nutty Delight: Add 1/2 cup of finely chopped nuts to the mixture for a satisfying crunch. Almonds or walnuts work beautifully, creating a wonderful contrast with the smooth coating.
- Spicy Kick: Mix in 1 teaspoon of cinnamon or a pinch of cayenne pepper to the batter for a warm spice note. It adds an unexpected heat that balances beautifully with the sweetness.
- Vegan Option: Substitute eggs with flaxseed meal (1 tablespoon flaxseed mixed with 3 tablespoons water) and use dairy-free frosting. You’ll still achieve that moist texture while keeping it plant-based.
- Minty Fresh: Stir in 1/2 teaspoon of peppermint extract into the frosting for a refreshing mint flavor. Perfect for those who enjoy a cool twist on traditional treats!
- Caramel Drizzle: After coating, drizzle melted caramel over the pops for an indulgent finish. This sweet addition elevates your cake pops and adds an irresistible sticky goodness!
Make-Ahead Tips for Cake Pops
These delightful Cake Pops are not only delicious but also perfect for meal prep, making them a fantastic treat for gatherings or a sweet surprise for your loved ones. You can prepare the cake base using just a box cake mix, 1 cup of water, 1/2 cup of vegetable oil, and 3 large eggs. Once baked and cooled, crumble the cake and mix it with 1/2 cup of buttercream frosting to form the cake balls. After chilling them for at least 30 minutes, you can melt 2 cups of chocolate chips with 1 tablespoon of coconut oil in advance. The entire process can be completed up to 24 hours ahead of when you need to serve the Cake Pops. Just remember to keep them in an airtight container in the fridge to maintain their quality. When you’re ready to enjoy them, simply coat the chilled cake balls with chocolate and add sprinkles before serving!
Cake Pops Recipe FAQs
What type of cake mix should I use for cake pops?
You can use any flavor of cake mix that you love! Whether it’s classic vanilla, rich chocolate, or even fun flavors like red velvet or lemon, the choice is yours. Each will bring its unique taste and character to your cake pops.
How do I store leftover cake pops?
If you have any cake pops left over (which is rare!), store them in an airtight container at room temperature for up to 3 days. For longer storage, you can refrigerate them for about a week. Just ensure they are well-wrapped to maintain their freshness!
Can I freeze my cake pops?
Absolutely! Cake pops freeze beautifully. Just place them in a single layer on a baking sheet until frozen solid, then transfer them to an airtight container or freezer bag. They can be stored in the freezer for up to 3 months. Thaw them in the fridge before serving for the best texture.
What should I do if my chocolate coating is too thick?
If your melted chocolate seems too thick to coat the cake pops smoothly, simply add a bit more coconut oil—just 1 teaspoon at a time—while stirring until you reach the desired consistency. The coconut oil helps thin it out and gives it a lovely sheen!
How many servings does this recipe yield?
This delightful recipe makes about 4 servings, with each serving containing approximately 150 calories. The actual number of cake pops may vary depending on how large you scoop your balls—so feel free to make them smaller or larger based on your preference!
Can I use homemade frosting instead of store-bought?
Certainly! Using homemade buttercream frosting can elevate the flavor of your cake pops even more. Whip up a batch using butter, powdered sugar, and a splash of vanilla extract for that extra touch of love and personalization in every bite!

Cake Pops
Ingredients
Method
- Preheat the oven to 350°F (175°C). Prepare the cake mix according to package instructions, combining cake mix, water, oil, and eggs.
- Pour the batter into a greased baking sheet and bake for 15-20 minutes until a toothpick comes out clean.
- Allow the cake to cool completely.
- Once cooled, crumble the cake into a large mixing bowl.
- Add the buttercream frosting to the crumbled cake and mix until well combined.
- Using a cookie scoop, form small balls of the mixture and place them on a baking sheet lined with parchment paper.
- Refrigerate the cake balls for at least 30 minutes to firm up.
- Melt the chocolate chips and coconut oil in a microwave-safe bowl, stirring until smooth.
- Dip the end of each lollipop stick into the melted chocolate, then insert it into the center of each cake ball.
- Dip each cake ball into the melted chocolate, allowing excess to drip off, and place back on the parchment paper.
- Sprinkle with decorations if desired before the chocolate sets.
- Once the chocolate has hardened, serve the cake pops on a decorative stand or in a container.

Leave a Comment