

Imagine sinking your spoon into a luscious slice of icebox cake, where layers of creamy goodness mingle with crisp, sweet cookies, creating a heavenly experience that’s as refreshing as a summer breeze. With each bite, the rich chocolate or fruity flavors dance on your palate, leaving you yearning for another taste of this delightful no-bake dessert that’s the star of every gathering.
As I recall my first encounter with icebox cake variations at a family barbecue, the laughter and joy intertwined with the sweetness of this treat made it unforgettable. Perfect for those lazy summer evenings or festive celebrations, these cakes promise not just a dessert but an adventure in flavor that will have everyone clamoring for seconds and sharing smiles long after the last slice is gone.
Why Is Icebox Cake Variations So Irresistibly Good?
Deliciously creamy layers of whipped heavy cream and powdered sugar create a rich base that’s hard to resist. No-bake convenience means you can whip it up in just 20 minutes, making it perfect for last-minute gatherings. Versatile flavors allow you to customize with fresh fruits or indulgent chocolate, appealing to every palate. Crowd-pleaser status is guaranteed, as this dessert delights both kids and adults alike!
Icebox Cake Variations Ingredients
- For the Base Layer
- 2 cups heavy cream (chilled) – Whip this until stiff peaks form for a light and airy texture.
- 1/2 cup powdered sugar (adjust to taste) – Sweeten to your liking; you can add more for a sweeter treat.
- 1 teaspoon vanilla extract – Use pure vanilla extract for a richer flavor profile.
- 1 box chocolate wafer cookies – These provide a delightful crunch and chocolatey flavor that complements the cream beautifully.
- For the Variations
- 1 cup fresh strawberries (sliced) – Add these for a refreshing burst of flavor and color in your dessert.
- 1 cup fresh blueberries – They not only look beautiful but also add a hint of tartness to balance the sweetness.
- 1 cup peanut butter (for peanut butter variation) – This rich ingredient creates a decadent twist, perfect for nut lovers.
- 1 cup chocolate chips (for chocolate variation) – Mix these in or sprinkle on top for extra chocolatey goodness in your Icebox Cake Variations.
How to Make Icebox Cake Variations
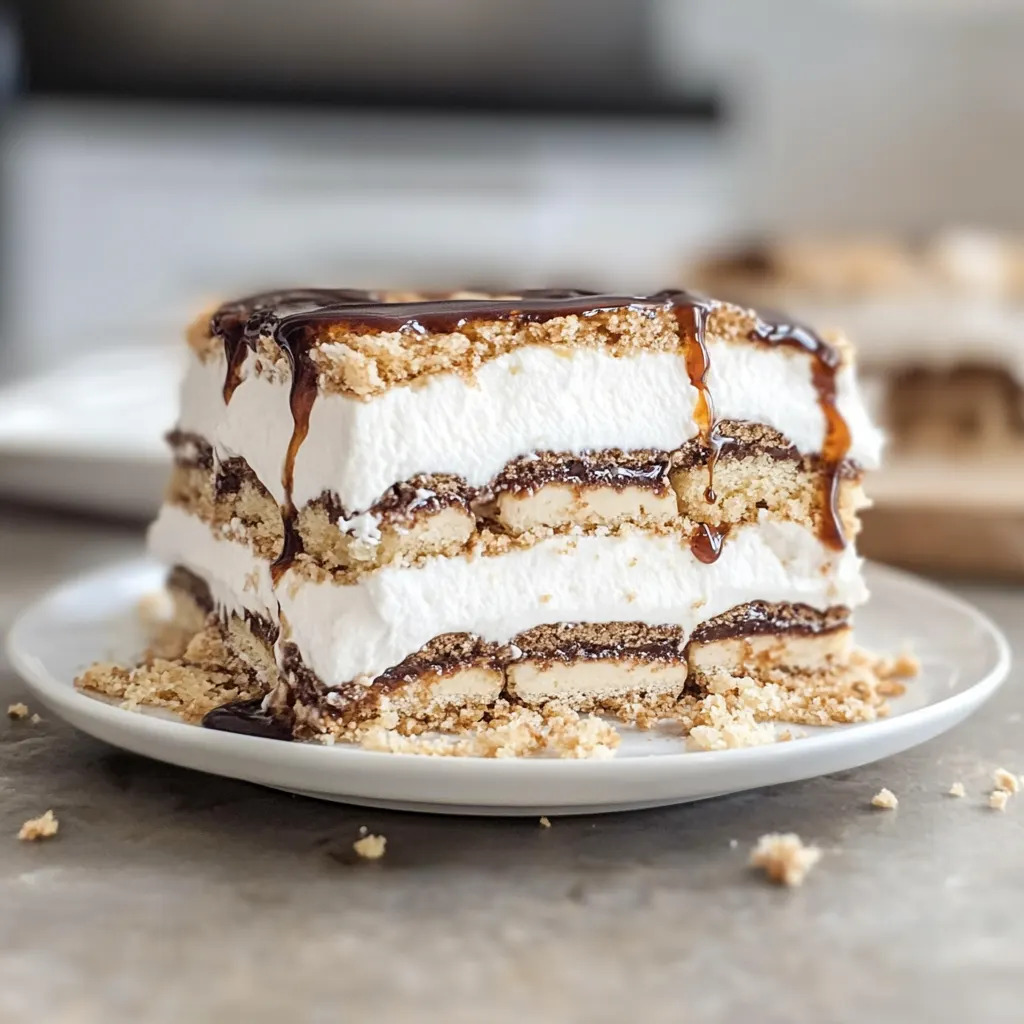
1. Whip the Cream: In a mixing bowl, whip together 2 cups of chilled heavy cream, 1/2 cup of powdered sugar (adjust to taste), and 1 teaspoon of vanilla extract until soft peaks form. This will create a light and fluffy texture!
2. Spread the Base: Gently spread a layer of your freshly whipped cream in the bottom of your baking dish. This creamy base sets the stage for delicious layers to come.
3. Layer the Cookies: Place a layer of chocolate wafer cookies on top of the whipped cream. These cookies will soften beautifully as they soak up flavors, adding a delightful crunch.
4. Add More Cream: Add another generous layer of whipped cream over the cookies, then sprinkle with sliced strawberries or blueberries if you’re using them. This adds vibrant color and fresh flavor!
5. Repeat the Layers: Continue layering until all ingredients are used up, finishing with a lovely layer of whipped cream on top. The more layers, the merrier!
6. Chill Out: Cover your dish with plastic wrap and refrigerate for at least 4 hours or overnight. This chilling time allows all those wonderful flavors in your Icebox Cake Variations to meld beautifully.
7. Slice and Serve: Once chilled, slice and serve your cake cold! For an extra touch, consider garnishing with additional fruit or chocolate chips for that wow factor.
Optional: Garnish with fresh mint leaves for a pop of color.
Exact quantities are listed in the recipe card below.
Expert Tips
- Chill Your Cream: Ensure your heavy cream is chilled before whipping; this helps achieve those delightful soft peaks for a fluffy texture.
- Adjust Sweetness: Taste the whipped cream after adding powdered sugar; everyone’s sweetness preference varies, so feel free to adjust according to your family’s taste.
- Layer Smartly: When layering, ensure cookies are completely covered with cream to prevent them from becoming too soggy in your icebox cake variations.
- Stir Gently: When adding fruit, gently fold it into the cream to maintain the light and airy texture of your dessert.
- Don’t Rush Chilling: Allow your cake to chill for at least 4 hours or overnight; this helps the flavors meld beautifully and ensures a great slice.
- Garnish Wisely: Consider garnishing with additional fruit or chocolate chips right before serving for an eye-catching presentation that will impress your guests!
How to Store and Freeze Icebox Cake Variations
- Fridge: Store your Icebox Cake Variations in an airtight container for up to 3 days to keep the layers fresh and the whipped cream fluffy.
- Freezer: If you want to save some for later, wrap individual slices tightly in plastic wrap and freeze for up to 1 month. Thaw in the fridge before serving.
- Room Temperature: It’s best to avoid leaving your Icebox Cake out at room temperature for more than 2 hours, as the cream can spoil quickly.
- Serving Tip: For optimal texture, allow frozen slices to sit at room temperature for about 10 minutes before enjoying, bringing back that creamy goodness.
Icebox Cake Variations Your Way
Get ready to unleash your creativity and make this delightful dessert even more irresistible with these simple twists!
- Berry Delight: Fold in 1 cup of fresh strawberries or blueberries for a burst of fruity freshness. The sweet and juicy berries complement the creamy layers beautifully, making each bite a summer dream.
- Peanut Butter Bliss: Add 1 cup of peanut butter to the cream mixture for a nutty richness. This variation creates a luscious, creamy texture that pairs perfectly with the chocolate wafers.
- Chocolate Indulgence: Mix in 1 cup of chocolate chips for an extra chocolaty treat. The rich chocolate flavor elevates the classic recipe, ensuring chocolate lovers are thoroughly satisfied.
- Coconut Cream: Substitute half of the heavy cream with coconut cream and add shredded coconut for a tropical twist. This variation brings a wonderful lightness and hints of paradise to your dessert.
- Minty Fresh: Incorporate a few drops of mint extract into the base layer for a refreshing surprise. This subtle mint flavor adds an invigorating twist that works wonderfully with chocolate.
- Caramel Swirl: Drizzle caramel sauce between layers for added sweetness and gooey texture. It creates an indulgent experience that balances beautifully with the crunch of the cookies.
- Spiced Pumpkin: Mix in 1/2 cup of pumpkin puree and a dash of cinnamon for a fall-inspired delight. This twist transforms your icebox cake into a seasonal favorite, perfect for gatherings.
Make Ahead Options
Preparing this delightful Icebox Cake Variations recipe is not only a breeze but also perfect for meal prep, allowing you to enjoy more time with family and friends during summer gatherings. You can whip up the base layer by mixing 2 cups of chilled heavy cream, 1/2 cup of powdered sugar, and 1 teaspoon of vanilla extract in advance. Additionally, you can layer the chocolate wafer cookies ahead of time to save precious moments on the day of serving. Simply spread a layer of whipped cream in your baking dish, place the cookies, add another layer of cream, and any sliced strawberries or blueberries if desired. After repeating these layers until all ingredients are used, cover your dish with plastic wrap and refrigerate it for at least 4 hours or up to 3 days to let those irresistible flavors meld beautifully. When you’re ready to serve, just slice it up and garnish with extra fruit or chocolate chips for that added touch. Enjoy the convenience and taste of Icebox Cake Variations made ahead!
Icebox Cake Variations Recipe FAQs
Can I use a different type of cookie for the base?
Absolutely! While chocolate wafer cookies give that classic flavor, you can experiment with graham crackers, Oreo cookies, or even shortbread for a unique twist. Just keep in mind that the texture and taste will vary slightly.
How long can I store leftover icebox cake?
You can store your icebox cake in the refrigerator for up to 3 days. Make sure to cover it tightly with plastic wrap to prevent it from absorbing any odors from other foods. The layers will continue to meld together, enhancing the flavor!
Can I freeze the icebox cake?
Yes, you can freeze it! To do this, slice your cake and wrap each piece individually in plastic wrap before placing them in an airtight container. It can last up to 2 months in the freezer. When ready to enjoy, simply thaw it in the refrigerator overnight.
What’s the best way to serve this dessert?
Slice your chilled icebox cake into squares and serve on individual plates. For an extra touch of elegance, garnish with fresh fruit or a sprinkle of chocolate chips on top. This delightful presentation is perfect for summer gatherings!
Is there a dairy-free alternative for the whipped cream?
Definitely! You can substitute heavy cream with coconut cream or a dairy-free whipped topping. Just make sure to chill your coconut cream beforehand and whip it until soft peaks form, similar to traditional whipped cream.
How many servings does this recipe yield?
This no-bake icebox cake serves about 4 people, making it perfect for a small gathering or a family dessert night. If you’re hosting a larger crowd, consider doubling the recipe—it’s easy to layer more ingredients without much extra effort!

Icebox Cake Variations
Ingredients
Method
- In a mixing bowl, whip the heavy cream, powdered sugar, and vanilla extract until soft peaks form.
- Spread a layer of whipped cream in the bottom of the baking dish.
- Place a layer of chocolate wafer cookies on top of the cream.
- Add another layer of whipped cream, followed by a layer of sliced strawberries or blueberries, if using.
- Repeat the layers until all ingredients are used, finishing with whipped cream on top.
- Cover the dish with plastic wrap and refrigerate for at least 4 hours or overnight to allow the flavors to meld.
- Slice and serve chilled, optionally garnishing with additional fruit or chocolate chips.


Leave a Comment