

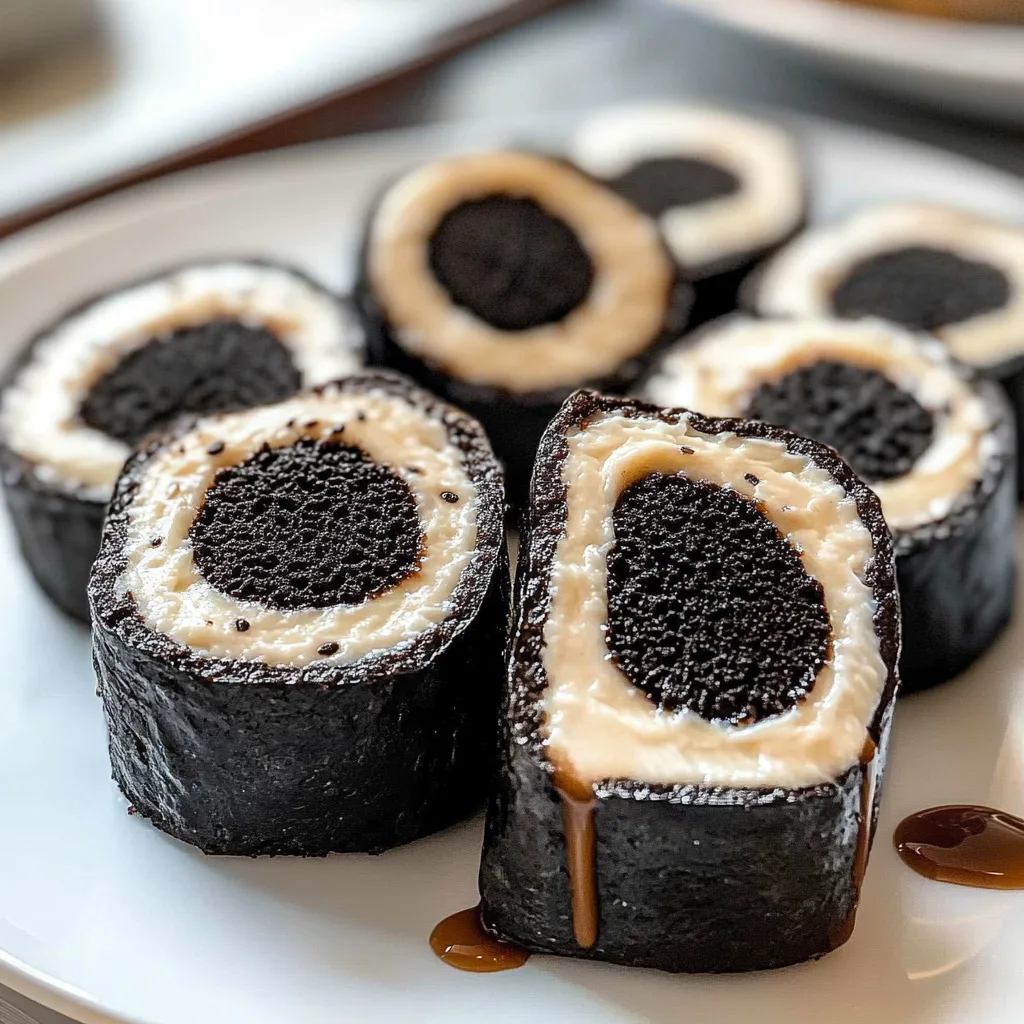
Imagine biting into a delightful fusion of flavors where the rich, creamy essence of Oreos meets the playful presentation of sushi. The crunchy texture contrasted with velvety cream creates a tantalizing experience that will have your taste buds dancing. Whether you’re preparing for a fun party or simply want to impress friends with a unique dessert, Oreo sushi rolled treats are sure to be the star of the show.
I still remember the first time I served these quirky delights at a gathering; laughter erupted as everyone tried to guess the ingredients. This dessert isn’t just a feast for your mouth—it’s a feast for the eyes too, making it perfect for celebrations or just an adventurous evening at home. With every bite, you’re in for an unforgettable flavor experience that blends nostalgia with creativity, leaving everyone craving more.
Why Is Oreo sushi rolled treats So Irresistibly Good?
Deliciously unique: These treats combine the beloved flavors of Oreos and marshmallow fluff, creating a delightful fusion that surprises and delights your palate.
Easy to make: With just a 30-minute prep time and no cooking required, you can whip up this fun dessert effortlessly.
Visually stunning: The vibrant colors from sprinkles and melted chocolate make these treats a showstopper at any gathering.
Versatile filling options: Customize your Oreo sushi with chocolate chips or other mix-ins for added texture and flavor.
Perfect for sharing: Whether it’s a party or a sweet surprise for family, these treats are sure to be a hit with everyone!
Oreo sushi rolled treats Ingredients
For the Base
- 1 package Oreo cookies (Crushed) – These will create the delicious, chocolatey foundation for your treats.
- 8 oz cream cheese (Softened) – Softened cream cheese binds the crushed Oreos and adds a creamy texture.
For the Filling
- 1 cup marshmallow fluff – This sweet, gooey filling gives a delightful contrast to the crunchy base.
- 1 cup rice crispy cereal – Adds a wonderful crunch that complements the softness of the marshmallow fluff.
- 1 cup chocolate chips (Optional) – For an extra layer of indulgence, you can fold in some chocolate chips.
For the Toppings
- 1 cup sprinkles (For decoration) – Brighten up your Oreo sushi rolled treats with colorful sprinkles for a festive look.
- 1 cup melted chocolate (For drizzling) – Drizzle over your treats for a decadent finish that ties everything together.
How to Make Oreo sushi rolled treats
1. Combine In a mixing bowl, combine 1 package of crushed Oreo cookies and 8 oz of softened cream cheese until well blended. The mixture should become a smooth, dark paste that holds together beautifully.
2. Mix In another bowl, mix 1 cup of marshmallow fluff, 1 cup of rice crispy cereal, and 1 cup of chocolate chips (optional) until thoroughly combined. This filling will add a delightful crunch and sweetness!
3. Spread Lay a sheet of plastic wrap on a rolling mat and spread the Oreo mixture evenly over it. Aim for an even layer about ¼ inch thick, ensuring every bite is delicious.
4. Layer Add the filling mixture in a line across the center of the Oreo layer. Make sure it’s centered so that each slice has an equal amount of that gooey goodness.
5. Roll Using the rolling mat, carefully roll the Oreo layer around the filling to form a log. Take your time to keep it tight and even for perfect sushi-like pieces later.
6. Wrap Wrap the log in plastic wrap and refrigerate for at least 15 minutes to set. This will help everything firm up nicely, making slicing easier.
7. Slice Remove the log from the refrigerator and unwrap it. Use a sharp knife to slice it into sushi-like pieces, revealing the beautiful layers within each treat.
8. Drizzle Drizzle melted chocolate over the pieces and sprinkle with colorful sprinkles before serving to add a festive touch that makes these treats irresistible!
Optional: For extra flair, consider using themed sprinkles based on your occasion!
Exact quantities are listed in the recipe card below.
Expert Tips
- Crushing Oreos: Ensure the Oreo cookies are finely crushed for a smoother texture, making it easier to blend with the cream cheese.
- Cream Cheese Consistency: Use softened cream cheese at room temperature; this helps create a creamy and cohesive Oreo base without lumps.
- Filling Balance: If adding chocolate chips, keep them to a minimum; too many can weigh down the filling and make rolling difficult.
- Roll Tightly: When forming the log, roll tightly but gently to prevent the filling from oozing out during slicing, ensuring perfect Oreo sushi rolled treats.
- Chill Time: Don’t skip refrigerating the log for at least 15 minutes; this step is crucial for better slicing and maintaining shape.
- Sharp Knife Use: Always use a sharp knife for slicing; it prevents squishing the pieces and keeps your presentation neat and appetizing.
How to Store and Freeze Oreo sushi rolled treats
- Fridge: Keep your Oreo sushi rolled treats in an airtight container for up to 5 days. This helps maintain their freshness and prevents them from drying out.
- Freezer: For longer storage, freeze the treats wrapped tightly in plastic wrap and then in aluminum foil for up to 2 months. Thaw in the fridge before serving.
- Room Temperature: If you’re serving them at a party, they can stay out for about 2 hours. Just make sure they’re not in direct sunlight to avoid melting.
- Reheating: There’s no need to reheat these delightful treats! Enjoy them chilled straight from the fridge or at room temperature for the best taste experience.
Oreo sushi rolled treats Your Way
Feel free to get creative and customize these delightful rolled treats to match your taste buds!
- Nut-Free: Substitute the rice crispy cereal with puffed quinoa for a crunchy alternative that’s safe for nut allergies. This little twist keeps the fun while catering to dietary needs.
- Vegan: Use vegan cream cheese and swap marshmallow fluff for a plant-based alternative. Your dessert will still be rich and creamy, perfect for any gathering!
- Chocolate Lover: Add an extra 1/2 cup of chocolate chips to the filling for a double chocolate experience. It’s like a sweet surprise in every bite, making it even more decadent!
- Coconut Delight: Mix in 1/2 cup of shredded coconut into the filling for a tropical flair. This adds a chewy texture and an unexpected burst of flavor that will leave everyone wanting more.
- Spicy Twist: Incorporate a pinch of cayenne pepper into the melted chocolate drizzle. The subtle heat complements the sweetness beautifully, creating an exciting contrast!
- Fruit Fusion: Fold in 1/2 cup of finely chopped strawberries or raspberries into the filling. This fruity addition lightens up each bite and brings a refreshing twist to your creation.
- Gluten-Free: Use gluten-free Oreos and rice crispy cereal to make this dessert accessible for everyone. Enjoy all the flavors without compromising on dietary restrictions!
Make Ahead Options
Preparing Oreo sushi rolled treats is a fantastic way to streamline your dessert plans, especially for parties or gatherings. You can easily make the Oreo base by combining one package of crushed Oreo cookies with 8 oz of softened cream cheese, which can be done up to 24 hours in advance. Additionally, you can mix the filling of 1 cup of marshmallow fluff, 1 cup of rice crispy cereal, and optional 1 cup of chocolate chips ahead of time—this mixture will hold up well for about 3 days in the fridge. Once you’ve rolled and wrapped the log in plastic wrap, refrigerate it for at least 15 minutes to set. When you’re ready to serve, simply slice the log into sushi-like pieces, drizzle with melted chocolate, and sprinkle with colorful sprinkles. This approach not only saves time but ensures that your delicious Oreo sushi rolled treats are a hit!
Oreo sushi rolled treats Recipe FAQs
What type of Oreos should I use for the base?
You can use any variety of Oreos, but classic chocolate Oreos work best for that rich, creamy flavor. If you’re feeling adventurous, try using golden Oreos for a different twist!
Can I substitute cream cheese with something else?
Yes! If you’re looking for a lighter option or dairy-free alternative, you can use vegan cream cheese or even whipped coconut cream. Just ensure it’s smooth enough to blend well with the crushed Oreos.
How long can I store the Oreo sushi rolled treats?
These delightful treats can be stored in an airtight container in the refrigerator for up to 3 days. However, they’re best enjoyed fresh, so make them right before your gathering if possible!
Is it possible to freeze Oreo sushi rolled treats?
Absolutely! You can freeze the uncut log wrapped in plastic wrap for up to 2 months. When you’re ready to enjoy them, let them thaw in the refrigerator overnight before slicing and serving.
What’s a good serving size for these treats?
This recipe makes about 4 servings, with each serving containing approximately 250 calories. Feel free to slice your logs into smaller pieces for bite-sized fun at parties!
What if my mixture is too crumbly?
If your Oreo base feels too crumbly and isn’t sticking together well, add a little more softened cream cheese—just a tablespoon at a time—until you reach that perfect consistency that holds together when pressed.

Oreo Sushi Rolled Treats
Ingredients
Method
- In a mixing bowl, combine crushed Oreo cookies and softened cream cheese until well blended.
- In another bowl, mix marshmallow fluff, rice crispy cereal, and chocolate chips until combined.
- Lay a sheet of plastic wrap on a rolling mat and spread the Oreo mixture evenly over it.
- Add the filling mixture in a line across the center of the Oreo layer.
- Using the rolling mat, carefully roll the Oreo layer around the filling to form a log.
- Wrap the log in plastic wrap and refrigerate for at least 15 minutes to set.
- Remove the log from the refrigerator and unwrap it. Use a sharp knife to slice it into sushi-like pieces.
- Drizzle melted chocolate over the pieces and sprinkle with colorful sprinkles before serving.


Leave a Comment