

Imagine biting into a slice of Flag Pie with Berry Design, where buttery, flaky crust meets a vibrant blend of luscious berries, bursting with sweet and tart flavors. The aroma wafting through the kitchen is simply irresistible, instantly transporting you to summer picnics and backyard barbecues, making every moment feel like a celebration of freedom and joy.
This delightful dessert holds a special place in my heart, reminding me of family gatherings where laughter mingles with the scent of fresh fruit. Whether it’s Fourth of July or any festive occasion, this pie promises to elevate your dessert table and leave taste buds dancing with delight. Get ready for an unforgettable flavor experience that will have everyone reaching for seconds!
Why Does Everyone Love Flag Pie with Berry Design?
Deliciously patriotic, this dessert is perfect for festive gatherings, bringing a burst of color and flavor to your table. Flaky crust made from cold butter ensures every bite melts in your mouth, while fresh mixed berries offer a delightful sweetness that’s both refreshing and satisfying. Easy to make, with just 30 minutes of prep, you’ll impress guests without the stress. Plus, its eye-catching presentation makes it a showstopper for any celebration! Whether for Independence Day or summer picnics, this pie is sure to be a crowd favorite.
Flag Pie with Berry Design Ingredients
- For the Crust
- 1 cup all-purpose flour – This forms the base, giving your pie a flaky texture that’s simply irresistible.
- 1/2 cup unsalted butter (cold and cubed) – Cold butter is key for a tender crust; consider using European-style butter for extra richness.
- 1/4 cup granulated sugar – Adds just the right amount of sweetness to the crust, balancing beautifully with the berry filling.
- 1/4 cup ice water (more if needed) – Ice water helps bind the dough without melting the butter, ensuring a flaky finish.
- For the Filling
- 2 cups mixed berries (strawberries, blueberries, raspberries) – Use fresh or frozen; mixed berries provide a colorful and tangy flavor reminiscent of a summer day.
- 1/2 cup granulated sugar (adjust based on berry sweetness) – Sweeten to taste, as different berries can vary significantly in sweetness.
- 2 tablespoons cornstarch (for thickening) – This helps thicken the filling, so it doesn’t ooze out when you slice your Flag Pie with Berry Design.
- 1 teaspoon vanilla extract – A splash enhances the natural flavors of the berries, adding depth to your dessert.
- 1 tablespoon lemon juice – Brightens up the flavors and balances sweetness, making each bite refreshing and vibrant.
How to Make Flag Pie with Berry Design
1. Combine Ingredients: In a mixing bowl, combine 1 cup all-purpose flour and 1/4 cup granulated sugar. Add 1/2 cup cold, cubed unsalted butter and mix until the texture resembles coarse crumbs.
2. Form the Dough: Gradually add 1/4 cup ice water, mixing gently until the dough comes together. If it’s too dry, feel free to add more water. Wrap in plastic wrap and refrigerate for 30 minutes to chill.
3. Preheat and Roll: Preheat your oven to 375°F (190°C). Once chilled, roll out the dough on a floured surface and fit it into your pie dish, creating an even crust that hugs the edges.
Make the Filling:
4. Mix Berries: In a bowl, gently combine 2 cups of mixed berries (strawberries, blueberries, raspberries), 1/2 cup granulated sugar (adjust based on berry sweetness), 2 tablespoons cornstarch for thickening, 1 teaspoon vanilla extract, and 1 tablespoon lemon juice.
5. Fill the Crust: Pour the luscious berry mixture into your prepared pie crust, spreading it evenly to ensure every slice is bursting with flavor.
Bake the Pie:
6. Bake Away: Place your pie in the preheated oven and bake for about 45 minutes or until the filling is bubbly and the crust turns a beautiful golden brown.
7. Cool & Decorate: Allow your pie to cool before serving. For that patriotic touch, decorate with additional berries arranged in a flag design to celebrate your creation!
Optional: Serve with whipped cream for an extra touch of delight!
Exact quantities are listed in the recipe card below.
Expert Tips
- Chill the Butter: Use cold, cubed butter for a flaky crust. This prevents the fat from melting too quickly, ensuring a light texture.
- Watch the Water: Add ice water gradually until the dough just comes together. Overworking will make it tough, impacting your Flag Pie with Berry Design.
- Berry Sweetness Check: Adjust sugar based on your berries’ sweetness. If using tart berries, don’t hesitate to increase the sugar for balanced flavor.
- Cornstarch is Key: Ensure even mixing of cornstarch with berries to avoid clumping. This thickens the filling beautifully without any lumps.
- Cool Before Decorating: Allow the pie to cool completely before adding extra berries for decoration. This helps maintain the vibrant color and shape of your flag design.
How to Store and Freeze Flag Pie with Berry Design
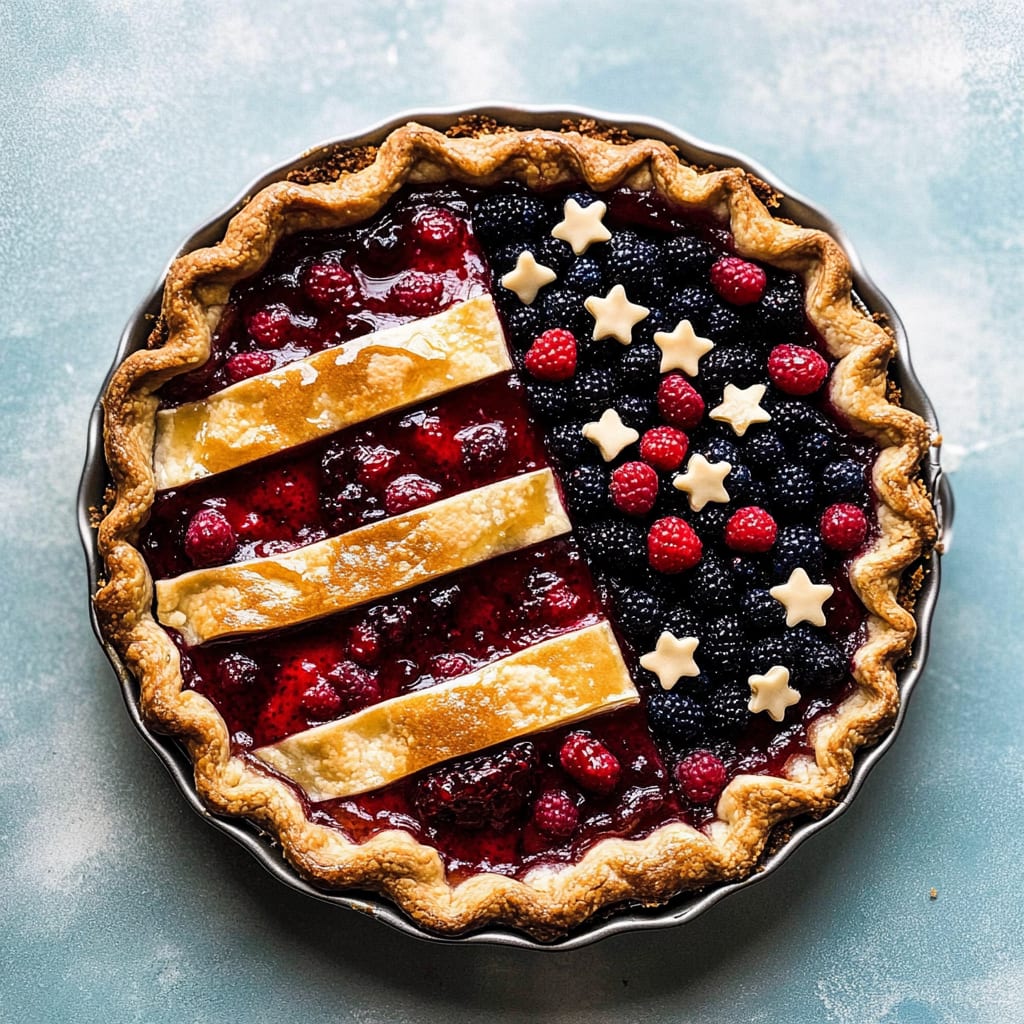
- Room Temperature: Keep the Flag Pie with Berry Design covered at room temperature for up to 2 days to maintain its flaky crust.
- Fridge: If you need it to last longer, store the pie in an airtight container in the fridge for up to 5 days.
- Freezer: For longer storage, freeze the pie wrapped tightly in plastic wrap and aluminum foil for up to 3 months.
- Reheating: To enjoy leftovers, preheat your oven to 350°F (175°C) and warm the pie for about 15-20 minutes until heated through.
Flag Pie with Berry Design Variations
Feel free to let your creativity shine and customize this delightful dessert to suit your taste!
- Gluten-Free: Substitute all-purpose flour with a 1:1 gluten-free blend for a deliciously tender crust. The texture might be slightly different, but it will still hold those vibrant berries beautifully.
- Vegan: Use coconut oil or a plant-based butter alternative in place of unsalted butter. This swap not only keeps the pie dairy-free but also adds a subtle richness, making every slice irresistible.
- Nutty Flavor: Replace half of the all-purpose flour with finely ground almond flour for a nutty twist. This variation brings an extra depth of flavor that pairs perfectly with the sweetness of the berries.
- Herb-Infused Crust: Add a teaspoon of finely chopped fresh basil or mint to the crust for a refreshing herbal note. It’s a fun way to surprise your guests with unexpected flavors that enhance the berry filling.
- Coconut Crust: Swap half of the butter for unsweetened shredded coconut. This addition gives your pie a tropical flair while maintaining that lovely flaky texture everyone loves.
- Spicy Kick: Incorporate a pinch of cinnamon or nutmeg into the crust for a warming spice element. These spices complement the sweetness of the fruit, creating an inviting aroma that fills your kitchen.
- Citrus Zing: Mix in some lemon or orange zest into the crust for an added burst of freshness. This twist brightens up each bite, making it feel like summer no matter the season!
- Chocolate Drizzle: After baking, drizzle melted dark chocolate over the finished pie for a decadent touch. The rich chocolate adds an indulgent layer that pairs beautifully with tart berries.
Make Ahead Options
This Flag Pie with Berry Design is perfect for meal prep, allowing you to enjoy a festive dessert without the last-minute rush. You can prepare the pie crust up to 24 hours in advance by mixing together 1 cup of all-purpose flour, 1/4 cup of granulated sugar, and cold cubed butter until crumbly. After adding 1/4 cup of ice water to form a dough, wrap it in plastic and refrigerate. Additionally, the berry filling can be prepped up to 3 days ahead; simply combine 2 cups of mixed berries (strawberries, blueberries, raspberries), 1/2 cup of sugar, 2 tablespoons of cornstarch, 1 teaspoon of vanilla extract, and 1 tablespoon of lemon juice in a bowl. When you’re ready to serve, roll out your chilled crust, fill it with the berry mixture, bake for about 45 minutes at 375°F (190°C) until bubbly and golden, and allow it to cool before adding that beautiful flag design with extra berries. This approach not only saves time but also elevates your dessert game for any celebration!
Flag Pie with Berry Design Recipe FAQs
What type of berries work best for this pie?
While the recipe calls for a delightful mix of strawberries, blueberries, and raspberries, feel free to get creative! Blackberries or even tart cherries could add a unique twist. Just remember to adjust the sugar based on the sweetness of your chosen berries—about 1/2 cup is a good starting point.
How can I prevent my pie crust from becoming soggy?
To keep your crust nice and flaky, consider pre-baking it for about 10 minutes before adding the filling. This “blind baking” helps set the crust and reduce moisture absorption. Also, ensure your berry filling isn’t overly wet by mixing in cornstarch, which thickens the juices beautifully.
Can I make this pie ahead of time? How should I store it?
Absolutely! You can prepare the pie up to two days in advance. Once baked, let it cool completely, then cover it loosely with plastic wrap or foil and store it in the refrigerator. For optimal freshness, enjoy within those two days!
Is it possible to freeze this pie?
Yes! If you want to make this patriotic dessert ahead of time, you can freeze it before baking. Wrap the unbaked pie tightly in plastic wrap and then in foil—this will keep it fresh for up to three months. When you’re ready to bake, just pop it directly into the oven at 375°F (190°C) for about 60-75 minutes.
How many servings does this flag pie yield?
This charming Flag Pie with Berry Design serves about 4 people, making it a perfect dessert for small gatherings or family celebrations. If you’re expecting a crowd, consider doubling the recipe and using a larger dish!
What can I serve with this pie?
This festive dessert pairs wonderfully with a scoop of vanilla ice cream or a dollop of whipped cream. For an extra touch, drizzle some homemade berry sauce made from extra mixed berries over each slice—it’s a delightful way to enhance both flavor and presentation!

Flag Pie with Berry Design
Ingredients
Method
- In a mixing bowl, combine flour and sugar. Add cold butter and mix until crumbly.
- Gradually add ice water until the dough comes together. Wrap in plastic and refrigerate for 30 minutes.
- Preheat the oven to 375°F (190°C). Roll out the dough and fit it into the pie dish.
- In a bowl, combine mixed berries, sugar, cornstarch, vanilla extract, and lemon juice. Mix gently.
- Pour the berry mixture into the prepared pie crust.
- Bake in the preheated oven for 45 minutes or until the filling is bubbly and the crust is golden.
- Allow to cool before serving. Decorate with additional berries to create a flag design.


Leave a Comment